Saturday, February 23, 2013

2 Minute Cleanup

At cleanup time, a stopwatch is a teacher's best friend.  On some art days we have a HUGE mess on the tables.  I kind of appreciate a good mess in the art room because I know that art is happening! With only 5 minutes between classes when I'm lucky, our beautiful art mess has to be completely gone in a matter of minutes!  

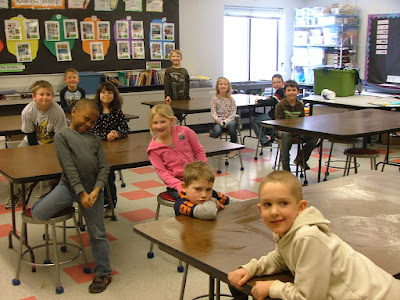
Check it out! Even my 1st Graders know how to do the 2 Minute Cleanup! 

Before: 2 Minutes on the Clock. Ready, Set, Go!

After: When the timer goes off, I count down slowly from 10.  Everyone is in their seats with heads down by the time I get to 1.  Jobs are completed and the room is looking good!  (Although, I do tell them that Sink Captains are allowed to still be finishing up since I know that is a big job)! 


This works for almost all classes, almost every time! They just love to race the clock.  I offer them an extra half box on our "Bonus Day" chart if they can do it with less than 3 mistakes.  Running and yelling will disqualify the class.  I gotta admit... I have fun at cleanup time too!

I usually save this for days when we have a lot to clean or set up.  Classes that have another class after them must not only clean up but set tables up for the next class!  Supplies each table needs for the next class are listed on the board.  Each table knows how many kids sit at their table in the next class and will put out the appropriate number of supplies!  


A House for Hermit

Our 2nd graders read A House for Hermit Crab by Eric Carle. We learned about how hermit crabs change shells as they out grow them.  Along the way, we met all kinds of creatures from the ocean such as sea anemones, coral, starfish,  lanternfish, snails, and a sea urchin!  We incorporated some of these cool finds into our artwork!  Looking good 2nd grade!  I used this book to help talk about the Great Barrier Reef in Australia since that is our cultural focus area this year!

Learning Goals: I can...
- Explain what a habitat is and give examples
- Describe creatures that live in a coral reef
- Connect art with other subject areas
- Use oil pastels to create a textured look (sand)
- Use materials appropriately 


Tuesday, February 19, 2013

Art Show 2013


Please bring your young artists to the Hudsonville Public Schools K-12 Student Art Show at its new location: Hudsonville City Hall! The show will run from Monday, April 22nd through Thursday, April 25th. City Hall will be open daily from 8:00 AM to 5:00 PM. School receptions will take place in the evenings from 5:30PM to 7:30 PM. The artist reception for Forest Grove and Bauer is on April 24th, from 5:30-7:30 pm. Everyone is invited to attend the reception and congratulate our young artists! The Hudsonville City Hall is located at 3275 Central Blvd. Hudsonville, MI 49426.

Picasso Blue Portraits

First graders learned about Pablo Picasso and his artwork.  We started by reading the book "Just Behave Pablo Picasso," by Jonah Winter.  I can't say enough good things about this book!  Sometimes even children's art books can be a little too much for first grade but this book did a great job of talking about Picasso's life in a way that my kids could understand.  It also provided grade level appropriate imagery that highlight the most famous works and periods in Picasso's life.  I will be buying this book for my art room library! 

The key facts we focused on for Pablo Picasso was the fact that he painted blue paintings when he was sad.  He painted rose colored paintings when he became happy again.  And, he was inspired by African masks when he started painting masklike faces.  We used 4 different values of blue for this project to remind us of Picasso's blue period.  We also created faces that look sort of like masks, in the style of Picasso.  Great job 1st grade!

Learning Goal: I can...
- Tell about Pablo Picasso
- Create a collage
- Explain what value is (the lightness or darkness of a color)
- Create texture in paint (by scratching into the wet paint)
- Use contrasting values to help facial features show up


Blue-Ringed Octopus

Since our elementary districtwide cultural focas area this year is Australia, I couldn't help but introduce classes to some of the unique wildlife found in Australia.  After studying Australian Aboriginal artwork and creating our Kangaroo dot paintings, we dove into the ocean for a closer look at this particularly unique creature! Fourth graders learned about the blue-ringed octopus.

The blue-ringed octopus is found along the southern coast of Australia.  While it is about the size of a golf ball it is one of the most deadly creatures for humans. The poison is produced by bacteria that live in the saliva of the octopus. Unlike other octopus, this octopus has blue rings that light up when it is agitated.   Here is a link if you want to read more!

Learning Goals: I can...
- Tell about the blue-ringed octopus (where is it found and what makes it different?)
- Use good craftsmanship to create smooth edges with paint (keep your paintbrush loaded)
- Show form using paint (add shadows to make it look more 3D)
- Use found objects to print bubbles (marker caps)


Sunday, February 17, 2013

Australian Clay Masks


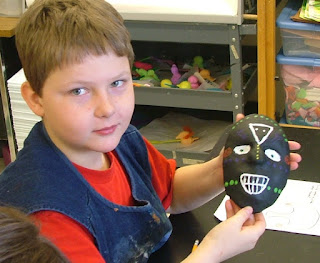
Fifth graders looked at Aboriginal (Native Australian) art and discovered some key characteristics of Australian Art.  We learned about Aboriginal dot paintings and x-ray paintings.  Aborigines use dots to create implied lines and pictures.  X-ray paintings are often found on cave walls. These paintings show both the outside and the inside (bones and internal organs) of the animal at the same time.  Bones are typically symbolized using white lines.  Fifth graders used this information as a guide for their mask making.

Learning Goals: I can...
- Describe major characteristics of Aboriginal Art (dot painting and x-ray painting)
- Describe the process for making a mask using a slab and mold
- Use symmetry to balance color
- Use dot and x-ray painting techniques


Mona Lisa Parodies

Wow! I have amazingly creative 3rd graders!  This has been a project that has been so exciting for ALL of us!  Everyone's art looks so unique and personalized.  I must admit I was really nervous about this project because I knew kids were going to need help left and right in order to figure out how to put their unique imaginations onto paper.  I'm so glad that I took a risk on this project idea. The rich opportunity for creativity and problem solving outweighed the pressure I feel to have a good product for parents to appreciate.  In the end, it turns out that my 3rd graders have already been developing the confidence and skills to handle the stress this project puts on them.  Sometimes I get nervous about pushing the envelope on this because at the end of the day no art teacher wants to give students more than they can handle and harm the trust our kids have in us!

First we looked at parodies of the Mona Lisa created by other famous artists (and some not so famous). We noticed that we knew it was the Mona Lisa mostly because of the face and the hand position.

Parody: A funny version of a famous picture, story or song.

We came up with a list of possible parodies we could illustrate using the face and hands of the Mona Lisa.  I found the kids understood it best when I explained that we needed to think of the Mona Lisa as an actress.  As a group we made a list of the roles the kids wanted her to play. (We laughed and laughed at these ideas).

Through my examples, I gave students the basic idea of how to show Mona leaning on something or standing showing her whole body.  From this point, students took off on their own and I moved around the room from student to student helping solve individual needs, providing advice and suggestions.

Learning Goals: I can...
- Tell about the Mona Lisa (here is a link to the video we watched)
- Explain what a parody is
- Create a unique Mona Lisa Parody
- Pencil lightly (so I can erase)
- Add color carefully


... and some finished masterpieces!