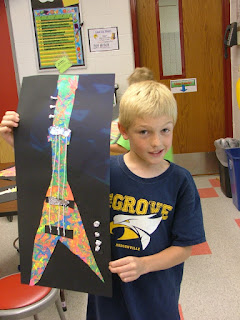
We used clothespins to hold the strings this year and it was SO much better than fingers!
After that, we did something that Pollock would have hated! We turned our awesome paintings into guitars! Students were given a photo reference sheet that had pictures of different guitars. Everyone was encouraged to create their own designs! This project was a blast for everyone!
Learning Goals: I can...
- Tell about Jackson Pollock
- Use creativity to make my guitar unique
- Explain that a graphic designer might help create the look of a guitar!


Hello! I love your blog! Thanks for posting your idea. How much direction did you give your kids with creating the details? Would you mind sending me a copy of the handout that you gave to give them a starting point if you still have it? Also, how did you get the strings to stay on? Very cool idea! (laurenjoyhughes@gmail.com)
ReplyDeleteI put together a handout with a bunch of pictures from google to show the kids the different guitar body shapes and designs. They did the rest! I had the kids draw a line of glue next to the string and then gently roll the string into the glue line. I emphasize that things will not stick until the glue is dry so that kids don't get worried when it's not staying well at first! I use "Elmers Glue All" not school glue.
DeleteGreat. Thank you for the quick reply!
ReplyDeleteI just did a version of this project with my 2nd graders, what an easy project and so much fun! The love splattering the paint with strings and I love how different all the guitars look. We made the necks of the guitar using recycled cereal boxes cut in strips and the look awesome! Thank you for sharing such a creative idea!
ReplyDeleteLuisa Dugas
Art Teacher
Dania Elementary, FL
Going to try this with my early elementary art students. Will have them draw and cut large flowers instead. Thanks for the inspiration!
ReplyDeletePam R
Art Teacher
Arlington Heights, IL
Just wanted to thank you for this lesson. We've started a new unit all about music and this slotted in perfectly and the children had so much fun doing it. Here are our results if interested (I've credited you, of course!)
ReplyDeletehttp://bricksandwood.blogspot.co.uk/2015/06/jackson-pollock-guitars.html
How cool! This is so great to see! Nice work!
DeleteI realize this post is slightly old, but maybe you'll see this. 12x18 paper is large enough to build a guitar that size? I am curious the size of the black paper. Also, do you have any tips on organizing the paint set up, so there's no contamination of colors. Like 1 dip per string, then trash? Thanks! I do love them!
ReplyDeleteYes that is the size I used. We cut a strip off the short side (12") to make the neck of the guitar before drawing the body of the guitar on! There is one string per color. I collect them at the end of class and wash them so I can use them again. I hope that helps!
ReplyDeleteVery much! Thank you for taking the time to respond! :)
DeleteWe just finished doing this project! They are hanging in the hallway and I can't believe how many compliments we have gotten on them! We had some really good class discussions about Jackson Pollock and whether they believed his art was good or not. Thanks for the lesson! I'll definitely be repeating it next year! I am still uploading photos, but you can see some of them here on our Artsonia page: http://www.artsonia.com/museum/gallery.asp?project=1093032
ReplyDeleteWow! They look great! I'd say your kids rocked it! Makes me want to do it again asap!
Delete